DIY Rain Barrel vs Store-Bought: Which Should You Pick? (October 2026)
For a rain barrel DIY project, choose a suitable container and fittings you can install; choose store-bought for a purpose-built barrel with defined features. Your space, tools and overflow plan point to the better fit.
On this page (7 sections)
- Rain barrel DIY vs store-bought: which should you choose?
- What should you compare before installing either option?
- How much capacity and space do you need?
- How should you manage debris and overflow?
- How do you set up and care for a rain barrel?
- What common rain barrel mistakes should you avoid?
- Which rain barrel choice fits your yard?
Choose a suitable container and compatible fittings for a rain barrel DIY project; choose a store-bought barrel if you want a purpose-built collection system with defined features. Your space, comfort with drilling and plans for overflow will help settle the choice.
Both approaches collect roof runoff, but they leave you different jobs. A DIY build gives you control over the container and outlet placement, while a ready-made barrel reduces the number of parts you need to choose.
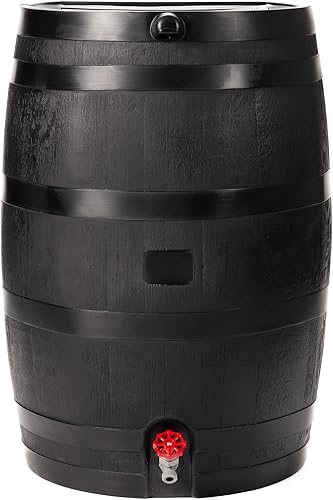
The RTS ECO is one store-bought option: a 50-gallon barrel made from 100% recycled plastic, with a flat back, plastic spigot and built-in overflow valve. A DIY barrel requires you to plan those parts and how they'll work together.
Rain barrel DIY vs store-bought: which should you choose?
Choose DIY if you have a suitable container and can install its fittings; choose store-bought if you want a purpose-built barrel with a known capacity and built-in features. The better fit depends on your tools, location and willingness to plan each connection.
A DIY project lets you choose the container size and outlet location. You also take responsibility for checking the container, making the openings, sealing the fittings, screening the inlet and routing overflow.
A ready-made barrel has a defined shape and capacity. The RTS ECO holds 50 gallons and includes a spigot and overflow valve, so you have fewer individual parts to source.
Is rain barrel DIY right for your setup?
Rain barrel DIY suits you if you can inspect the container, reach its interior and fit the connections carefully. Skip it if you can't confirm what the container held, don't have a stable location or aren't comfortable drilling and sealing openings.
Before making holes, check the container's material and the fitting requirements. The spigot should sit high enough to leave room for a watering can, but low enough to draw water from the barrel.
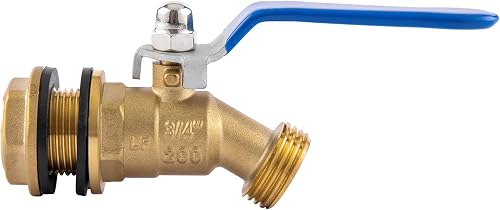
The BILAL spigot is an option when you want to choose the outlet separately. It has a brass quarter-turn valve and a 3/4-inch male GHT outlet, and you need access inside the container to secure its nut.
When does a store-bought rain barrel make more sense?
Store-bought suits you when a defined capacity, shape and overflow feature simplify your setup. Skip the RTS ECO if you need a different capacity or outlet arrangement, or if its footprint doesn't fit your location.
The RTS ECO's flat back can sit snugly against a wall or fence, which helps where space is narrow. Its stand is optional and sold separately, so plan the support and outlet height as part of the setup.
Choose a ready-made barrel if you don't want to find a container and match fittings to it. You still need to plan the downspout connection, foundation clearance and overflow destination.
What should you compare before installing either option?
Compare the location, water path, outlet access and overflow route before choosing a barrel. DIY adds container and fitting decisions; a store-bought model gives you its basic dimensions and features upfront.
Measure the spot and check its distance from the downspout. Leave room to reach the spigot, inspect connections and send overflow to a safe area.
For the route from roof drainage to storage, see our guide to installing a rain barrel on a downspout. It helps you plan the connection whichever barrel you choose.
What does a DIY barrel need?
A DIY barrel needs a suitable container, a screened inlet, a sealed outlet and an overflow plan. Decide where each opening belongs before drilling, and make sure you can reach the inside of the container to tighten the fitting.
The VYH kit includes 2 PVC ball valves, 2 plastic adapters and thread seal tape. Its 3/4-inch GHT fittings may suit a build that needs two outlets, but check the fit and sealing method for your container.
Don't assume a fitting will match simply because its thread size sounds familiar. Check the hole size, wall thickness, gasket placement and clearance for the nut before you cut.
What does a store-bought barrel need?
A store-bought barrel still needs a measured location, stable support and a clear downspout route. Check its footprint and spigot access before setting it in place.
The RTS ECO measures 24 x 19 x 34 inches and has a flat back. Leave enough room around it to use the outlet and reach the overflow valve.
A full barrel is heavy, so the base must be level and able to support the filled container. The RTS ECO's stand is optional and sold separately.
For help deciding on elevation and outlet access, read whether a rain barrel needs a stand.
How much capacity and space do you need?
Choose capacity based on the space available, roof runoff and how you'll use the water. A larger barrel can store more, but it also needs more room and a stronger base.
With a DIY build, you choose the container, provided it is suitable for rainwater collection and can be fitted safely. A purpose-built barrel gives you a known capacity to plan around: the RTS ECO holds 50 gallons.
Think about the outlet, too. If you plan to fill watering cans, leave room below the spigot; for hose use, check that the outlet and barrel height work with your hose connection.
If one barrel may not hold enough, plan for expansion before installing anything. Our guide to connecting two rain barrels covers the layout choices involved.
How should you manage debris and overflow?
Keep leaves and roof debris out of the barrel, and direct excess water away from the foundation. These tasks matter whether you build a barrel or buy one.
Plan an inlet screen or filter that you can inspect and clean. A screen that fills with leaves can restrict collection, so keep it accessible rather than burying it behind the barrel or downspout.
The RTS ECO includes a built-in overflow valve. A DIY build needs its own outlet, positioned so excess water won't pool next to the house or create a muddy walkway.
Read where a rain barrel overflow should go before settling on a location. If you're deciding whether to add an inlet screen or filter, see whether a rain barrel needs a filter.
How do you set up and care for a rain barrel?
Set the barrel on stable, level support, connect the downspout, check the outlet and test the overflow path with water. Keep the inlet and fittings accessible so routine checks don't require moving the barrel.
For a DIY build, measure twice before drilling. Install the gasket and fitting as directed, tighten the connection without forcing it, then check for drips before connecting the barrel to the downspout.
For a ready-made barrel, follow its installation instructions and confirm the spigot and overflow are accessible after positioning. Don't block the overflow outlet with a wall, planter or storage item.
After storms, clear leaves from the inlet screen and check the spigot and connections for leaks. Before freezing weather, follow the barrel and fitting care instructions for your climate, and drain or store components as needed.
What common rain barrel mistakes should you avoid?
Most setup problems come from poor placement, an unplanned overflow route or a fitting that doesn't match the container. A short check before filling can prevent leaks, blocked flow and awkward access.
- Don't place a barrel on uneven ground. A filled container needs stable, level support.
- Don't drill before checking the fitting. Confirm the opening, wall thickness and interior access requirements first.
- Don't aim overflow at the foundation. Decide where excess water will go before connecting the downspout.
- Don't hide the inlet or spigot. Leave room for cleaning the screen and drawing water.
- Don't compare only the barrel cost. Include fittings, a diverter, a screen and a suitable base in your DIY plan.
Which rain barrel choice fits your yard?
Choose DIY if you have a suitable container and want control over its fittings; choose store-bought if a defined capacity and built-in overflow fit your space. The RTS ECO is a practical ready-made choice for a compact spot where its 50-gallon capacity and flat back work.
Choose the BILAL spigot if your DIY plan calls for a brass quarter-turn outlet and the container gives you interior access. Choose the VYH kit if you need two PVC valves and adapters and can plan and seal both openings.
Before you decide, measure the location, plan the downspout connection and trace the overflow route. Then use our rain barrel installation guide to prepare the setup.
Frequently asked questions
Is a DIY rain barrel cheaper than buying one?
It can cost less if you already have a suitable container and tools, but compare the full setup before deciding. Add the cost of fittings, an inlet screen, a downspout diverter, a stable base and any overflow parts you need.
A ready-made barrel may include some of those features.
The RTS ECO, for example, has a spigot and overflow valve.
What should I check before making a rain barrel?
Check the container's intended use, condition, stability when full and compatibility with your fittings. Plan the inlet, screened opening, spigot height and overflow route before drilling.
Measure the location and check local rules for rainwater collection and placement.
Make sure the finished barrel will be easy to reach and maintain.
Does a rain barrel need an overflow outlet?
Yes. Plan where excess water will go before installing the barrel, and route it away from the house foundation so it doesn't pool beside the building.
The RTS ECO has a built-in overflow valve.
A DIY barrel needs a suitable outlet and a clear path for the overflow.
Can I add a brass spigot to a DIY barrel?
You can use a brass spigot if the container wall, hole and fitting are compatible. The BILAL spigot has 3/4-inch male GHT threads and needs access inside the container to secure its nut.
Check the fitting instructions and container material before drilling.
The required opening is about 1 inch.
How do I connect two rain barrels?
Use compatible connections and plan how water will move between the barrels before filling them. Keep both barrels stable, allow for overflow and check that the connecting point fits their openings.
See our guide to connecting two rain barrels for layout considerations.


